Creating a Simple Login Page using ASP.NET and C#
A tutorial to create a simple login page using ASP.NET and C#.
This page is still under construction!!!
Learning Outcomes
In this tutorial, we will:
- Learn how to create a functional login page using ASP.NET and C#.
- Learn how to establish connection to a database.
- Learn how to manipulate data using C#.
Prerequisite
This tutorial is based on the Login page and the database which we have created in the previous tutorial. Please refer to:
- Getting Started: ASP.NET Web Programming with C#
- Creating a Simple Database in ASP.NET
I will suggest you to look into the tutorial on xxxx.
Why do we need to learn this?
The Login page is an essential part for a web site. It helps to ensure that only the authenticated users will have access to our web site. In this tutorial, we are going to adopt a traditional approach in developing a functional Login page, where we will create almost everything from scratch.
I know many of you may question WHY we need to do this since we can easily create a Login page using a readily available Login class or the ASP.NET MVC framework. In fact, using the Login class and ASP.NET MVC framework help us to accomplish the task quickly (which is best for a professional software developer), and results in a more secure web application.
However, I found that creating a simple Login page from scratch is a perfect working example for us to learn about ASP.NET web programming with C#. My learning philosophy is that we need to start from the basic to build a stronger foundation.
By working on this simple Login page, we will learn how to connect and retrieve data from the database. We will also learn how to use C# to manipulate this data. Finally, this simple Login page provides us with some examples of the design and security flaws in a web site, and we will then learn how to fix these flaws in the upcoming tutorials.
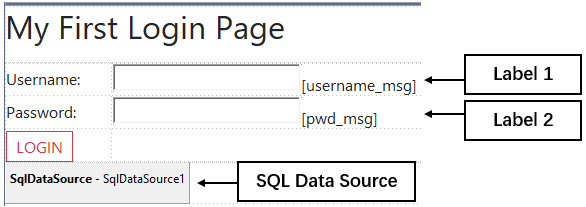
Adding ASP.NET Controls in the Login page
I see Control as a useful feature in ASP.NET which helps us to speed up our web development process. Of course, it also provides a more structured programming model for the web site. We are going to add three controls (two Label controls and one SQL Data Source control) in our Login page:
-
To add a Control, first open the Toolbox by selecting Add → Toolbox. Under Data, select SqlDataSource. Drag-and-drop it to the area under the LOGIN button. This control represents a connection to a database, which we will define later.
-
Next, go to Standard and click on Label. Drag-and-drop it right to the Username textbox. Add another label for the Password textbox. We will use these labels to display the error message if an user enters the incorrect user name or password.
- Once we have added the labels, we will notice that in our ASP.NET codes, a new line of code is added under each of the text box:
<asp:TextBox ID="username_txtbox" runat="server"></asp:TextBox> <asp:Label ID="Label1" runat="server" Text="Label"></asp:Label> - Now, we are going to modify the properties for label which is beside the Username textbox. There are two ways we can do this. First, modify the codes above directy or change the label’s properties through the Properties window. For the first method, we can update the codes as follow:
 <asp:TextBox ID="username_txtbox" runat="server"></asp:TextBox>
 <asp:Label ID="username_msg" Visible="false" runat="server" Text=""></asp:Label>
For the second method, we just need to click on the label in Design mode and update the properties through the Properties window:
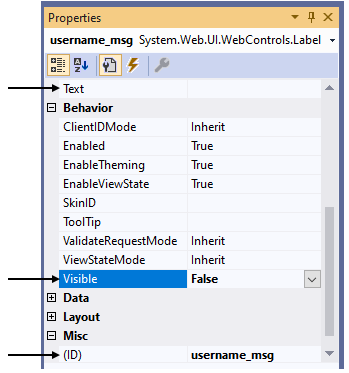
The three properties which we have udpated are:
- Text: The text to be shown for the label (We change it to “” as no error message is required when user first visit the Login page)
- Visible: Indicates whether the label is visible (We set it to false so the label is not visible when user first visit the Login page)
-
ID: Programmatic name of the label (We change it to
username_msgfor the Username label for better readability of the codes)
- Repeat the step above for the label beside the Password textbox.
Configuring Data Source
Now, we are going to configure the newly created SQL Data Source to the database (aspnettutorial.mdf) which we have created in the previous tutorial.
-
Click on the SQL Data Source control and click on the smart tag (>). Then, select Configure Data Source.

-
From the drop-down list, select
aspnettutorial.mdfas our data connection. Click Next. If you do not have the option to chooseaspnettutorial.mdf, then you will need to first complete this tutorial.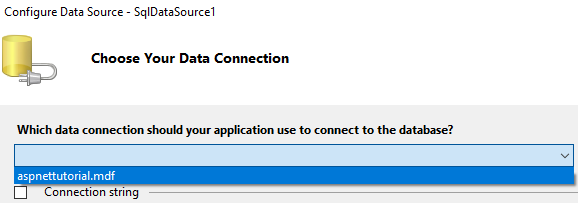
-
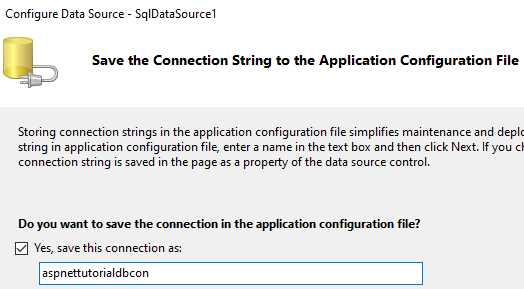
Assign a name to this connection. In my case, I named it as
aspnettutorialdbcon, wheredbconstands for database connection. Check the Yes, save this connection as: box and Next.
-
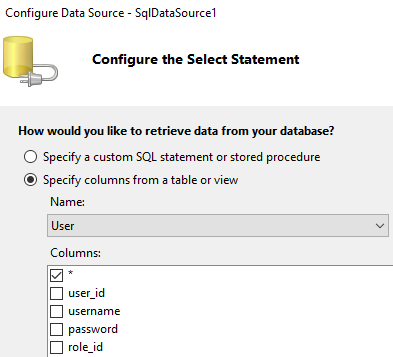
Next, we are going to configure the table which we are going to retrieve our data. Since it is a Login page, and we will need to use the users’ data, so we will choose User as our table. Check the (*) box, which indicates that we are going to select/query all columns from the User table. Click Next.
-
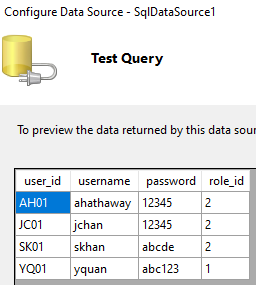
Finally, lets test the query by clicking on the Test Query button. We are supposed the see all the data from our User table. Click Finish.
-
Go to the Solution Explorer, and open
Web.configunder the ASPNetTutorial project. We are supposed to see a connection string created within the<configuration></configuration>tag:<connectionStrings> <add name="aspnettutorialdbcon" connectionString="Data Source=(LocalDB)\MSSQLLocalDB;AttachDbFilename=|DataDirectory|\aspnettutorial.mdf;Integrated Security=True" providerName="System.Data.SqlClient" /> </connectionStrings>
Create a Method for the Login button
A method (a.k.a function) is a block of code which only runs when it is called. We can pass data, known as parameters, into a method. In our case, we want to run a method using C# so that when a user hit the login button, a series of code will be executed to establish the database connection, retrieve username and password submmited by the user from the Login form, and compare the data with the one stored in the database and respond accordingly (e.g. login sucessfully or failed).
It is very easy to create an empty C# method with Visual Studio. In the Split/Design window, double click on the Login button. The Login.aspx.cs will be opened and we wil notice a C# method created automatically:
protected void Button1_Click(object sender, EventArgs e)
{

}
The method name is Button1_Click. The explanantion for the four elements associated with the method is as follow:
-
Keyword: This method is only accessible within its class (in our case, it is the
Loginclass) and by derived class instances. - Void: This indicates that the method does not return a value.
-
Object Sender:
Senderis a parameter that contains a reference to the control/object (in our case, it is theLoginbutton) that raised the event. -
EventArgs e:
eis the parameter that contains the event data.
To better explain the purpose of this method, we can rename the method to protected void login_btn(object sender, EventArgs e). However, by changing the name of this method, we will also need to update the codes in Login.aspx:
<td style="width: 118px">
    <asp:Button ID="login_button" class="btn btn-outline-danger" runat="server" Text="LOGIN" OnClick="login_btn" />
</td>
We update the code to OnClick="login_btn" which indicates that everytime a user hit on the Login button, the method login_btn will be invoked.
Connect and Query the Database using C#
The first thing which we want to do when the user clicks on the Login button is to establish a connection to the database and retrieve data from the User table. To create a connection to the database (in this case, aspnettutorial.mdf), we need to add the following codes into our login_btn method:
SqlConnection con = new SqlConnection(ConfigurationManager.ConnectionStrings["aspnettutorialdbcon"].ConnectionString);
con.Open();
Note that aspnettutorialdbcon is the name given to our database connection when we first configured our data source. We can refer back to our Web.config to verify it.
While we type in the codes above, we might see red lines under the SqlConnection and ConfigurationManager. This is because we do not import the libraries needed to access the classes. To import these libraries, we can add the lines on top of the Login.aspx.cs file:
using System.Data;
using System.Data.SqlClient;
using System.Configuration;
Next, we are going to query the User table with the following line of code:
SqlCommand cmd = new SqlCommand("select * from [User] where username=@usrname and password=@pwd", con);
The explanation for the SQL statament used above is as follow:
- select * from: * indicates all columns in the tables
- [User]: this is the table which we want to query. Note that we use [] because User is a reserved word in SQL. In normal circumstance, [] is not needed.
- where: Here, we impose a filter to the query
- username=@usrname and password=@pwd: The filter indicates that only a record which matched the given @usrname AND @pwd will be returned. @usrname AND @pwd are both variables which I will explain in the next section.
Comparing User Inputs with Database Record
In the previous section, we created a filter to query for records in the database where the username and password matched the @usrname and @pwd variables respectively.