Getting Started: ASP.NET Web Programming with C#
A tutorial to familiarise with Visual Studio to learn ASP.NET web programming with C#.
- Learning Outcomes
- Why we need to learn this?
- Requirements
- Create the Project
- Familiarise with Visual Studio
- Our First ASP.NET Web Page
- Best Practices
- Takeaways
Learning Outcomes
In this tutorial, we will:
- Familiarise with the components in Visual Studio, including Solution Explorer, Toolbox, Properties and Project View.
- Learn how to to develop a single ASP.NET webpage with Visual Studio.
Why we need to learn this?
I believe you are here because you want/have to learn ASP.NET Web Programming. To learn ASP.NET, we need to use its de facto IDE - Microsoft Visual Studio.
My experience tells me that it is always better to start by having a brief tour of the tool which we are going to use in developing a project. By mastering the tools, it is going to save a huge amount of time throughout the learning process.
Requirements
Microsoft Visual Studio (I am using the 2019 version). See here on how to download and install.
Create the Project
-
Open our Visual Studio IDE and click on:
Alternatively, click on FILE → New Project. -
Choose the ASP.NET Web Application (.NET Framework). Make sure it is the C# template.

-
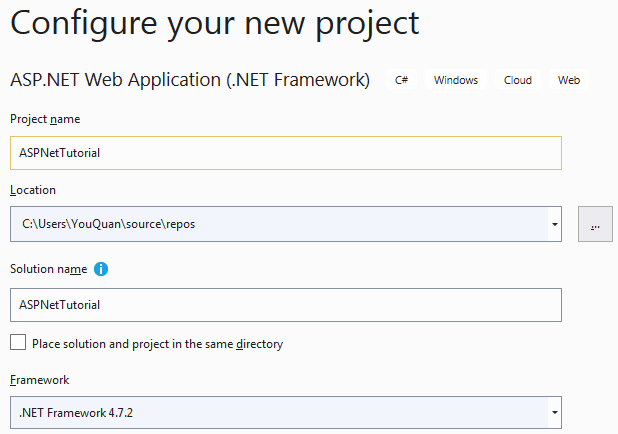
Configure the project by having a Project name and Solution name. Take note on the location where the project is going to be saved. The version of the framework which I am using is .NET Framework 4.7.2. Click Create.
-
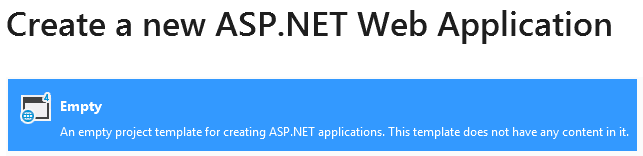
Create a new ASP.NET web application by choosing the Empty template. Click Create again.
-
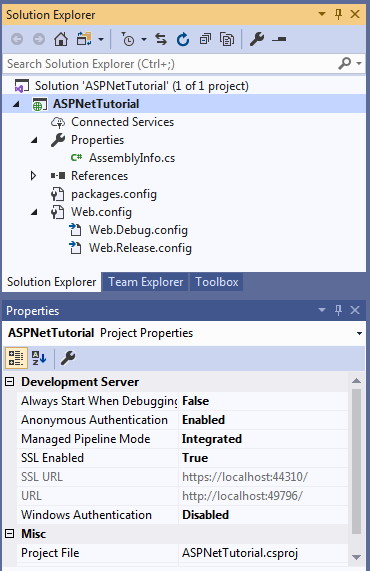
The new project will be opened and the Solution Explorer will display the details of this project (my project is ASPNetTutorial). That is fine if you cannot find your Solution Explorer now, I will give you a tour of Visual Studio in the next section.
Familiarise with Visual Studio
-
There are four must-know components in Visual Studio: Solution Explorer, Toolbox, Properties and Project View. Usually, the Solution Explorer will be readily available when we open a project. When we click on the project name in the Solution Explorer (mine is ASPNetTutorial which highlighted in blue), we will also see the Project Properties:
However, if you cannot see your Solution Explorer, go to the top of the Visual Studio and click on View → Solution Explorer. -
To introduce the functionalities of other components, we need to first create an empty web form. Right click on the project’s name (mine is ASPNetTutorial), then click Add → Web Form. Name the item as Login because we are going to create a simple Login interface. Now, we are supposed to have a
Login.aspxfile. This file contains basic HTML codes with<head></head>,<form></form>and<body></body>.<%@ Page Language="C#" AutoEventWireup="true" CodeBehind="Login.aspx.cs" Inherits="ASPNetTutorial.Login" %> <!DOCTYPE html> <html xmlns="http://www.w3.org/1999/xhtml"> <head runat="server"> <title></title> </head> <body> <form id="form1" runat="server"> <div> </div> </form> </body> </html> -
Below the
Login.aspxfile, there is a component which I call it as Project View. It allows us to view our project in three different views: Design, Split and Source. Personally, I like Split view which provides us with Source and Design in the same window.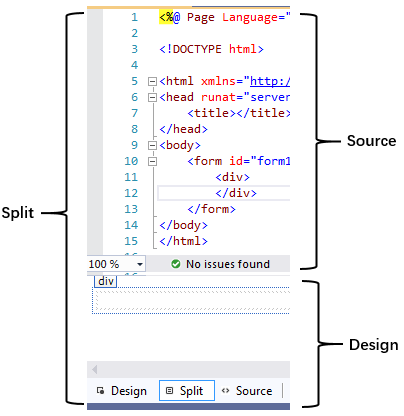
-
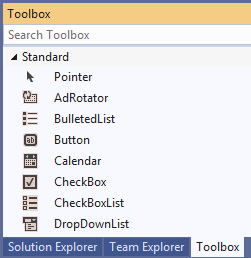
Another important component which we will use frequently is the Toolbox. To add this component, go to the top of the Visual Studio and click on View → Toolbox. In the Toolbox, there are various types of elements which we know as Controls in ASP.NET. These controls help to speed up our development process. We will see how Toolbox and Controls work in the next section.
Our First ASP.NET Web Page
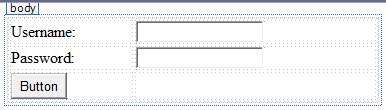
Now, we are going to familiarise with the components in Visual Studio by creating a simple Login interface. This Login interface will have a username text box, a password textbox and a login button. The text boxes and the button will be placed in a 3 (rows) x 2 (columns) table:
| Username: | Username’s Textbox |
|---|---|
| Password: | Password’s Textbox |
| Login button |
If you have learnt HTML, then you must know the we can manually code the layout presented above using HTML syntax such as <form></form>, <table></table>, <tr></tr>, <td></td>, <input type="text"> and <input type="submit">.
However, with Visual Studio, this layout can be developed with very little manual coding or no manual coding at all.
-
Let’s start by adding a 3 (rows) x 2 (columns) table inside the
<div></div>tag. Move our mouse cursor inside the<div>box:

Go to the top of the Visual Studio and click on Table → Insert Table. Create a 3 (rows) x 2 (columns) table. -
Type the text
UsernameandPasswordinto the designated table cells. -
We are going to use the Toolbox to create our textboxes and button. In the Toolbox, select Standard → TextBox. Click on the TextBox, and drag-and-drop it into the designated
Username's Textboxcell. Repeat forPassword's Textbox. -
To add the Login button, select Standard → Button. Click on the Button, and drag-and-drop it into the designated
Login buttoncell. By now, we should have a layout as follow:
-
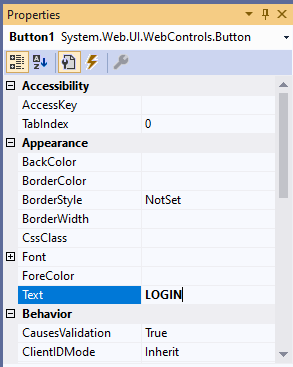
Note that the text inside the Login button is
Button. To change the text toLogin, click on the Login button. The Properties window of the Login button will be shown right below the Solution Explorer. Change theTextof the button toLOGIN.
- We can always make changes on this Login page by adding or modifying the HTML codes, without using the Toolbox. Let say if I want to add a title to this page, I can add the
<h1></h1>directly to the existing HTML codes:<form id="form1" runat="server"> <div> <h1>My First Login Page</h1> <table style="width: 100%"> <tr> <td>Username:</td> ... other codes here .... </tr> </table> </div> </form>Every time we make changes to the code, a warning message Design view is out of sync with Source view. Click here to synchronize views will be displayed. Click on the message and we will see the changes we made reflected in the Design view.
-
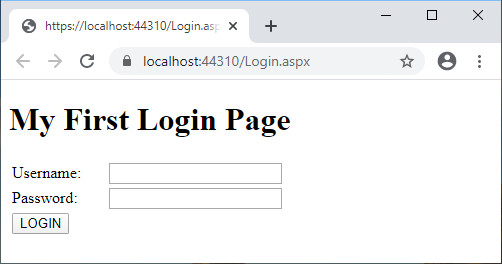
Now, let’s try to run the project and check if everything is working as intended. By default, we will see a green arrow and IIS Express (Microsoft Edge) on top of our Microsoft Visual Studio. Personally, I prefer to run everything in Google Chrome. To change the default setting, click on the down arrow and select Google Chrome (if you have Google Chrome installed).
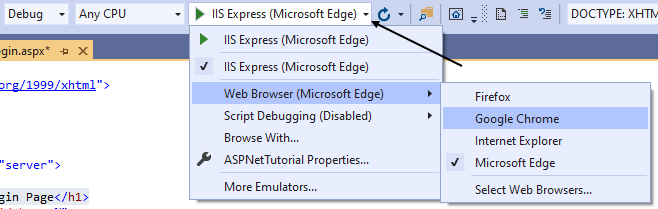
- Click on
IIS Express (Google Chrome). Google Chrome will open shortly with our very first Login page developed using ASP.NET:
Best Practices
There are many best coding practices (which you can read here). But, I just want to focus on one of these practices in this tutorial - Naming conventions. Using meaningless naming can cause confusion to reduce the readability of our codes. Take our Login page for example, if we browse through these HTML codes, we will notice some meaningless naming as follow:
<form id="form1" runat="server">
<asp:TextBox ID="TextBox1" runat="server"></asp:TextBox>
<asp:TextBox ID="TextBox2" runat="server"></asp:TextBox>
<asp:Button ID="Button1" runat="server" Text="LOGIN" />
The names which are automatically assigned to the HTML elements by Visual Studio can cause confusion, especially when our web project grows bigger. Hence, it is always a good practice to replace these IDs with meaningful names:
<form id="login_form" runat="server">
<asp:TextBox ID="username_txtbox" runat="server"></asp:TextBox>
<asp:TextBox ID="pwd_txtbox" runat="server"></asp:TextBox>
<asp:Button ID="login_button" runat="server" Text="LOGIN" />
Note that we can change these names by modifying the HTML codes directly, or by changing the properties of these controls (e.g. button, textbox) via the Properties window.
Takeaways
I hope by now:
- You know how to use Visual Studio along with its components: Solution Explorer, Toolbox, Properties and Project View.
- You are confident to create a single ASP.NET web page with Visual Studio (e.g. a login page, a form).
Coming up next, we will learn:
- How to create a Master page for a multiple pages web site in ASP.NET. (Click here for the tutorial)
I hope you found this tutorial helpful! If you have more questions about this tutorial, please let me know by commenting below.