Creating a Master Page in ASP.NET
A tutorial to create a Master Page in ASP.NET.
- Learning Outcomes
- Prerequisite
- Why we need to learn this?
- Requirements
- A Web page Layout
- The Sitemap
- Create a Master Page with ASP.NET
- Code the Master Page with Bootstrap
- Add Content to Other Pages
- Set the Start Page and Run Our Project
- Takeaways
Learning Outcomes
In this tutorial, we will:
- Learn what is a web page layout and a sitemap.
- Learn how to create a Master page for a multiple pages web site in ASP.NET.
- Learn how to use Bootstrap to design the Master page, with a focus on the navigation bar.
Prerequisite
If you are new to ASP.NET, I suggest you to look into this tutorial to learn how to create an ASP.NET web project with Microsoft Visual Studio.
Why we need to learn this?
I believe you should have known how to create a single ASP.NET web page by now. However, in real life, a web site is made up of multiple web pages. Take Twitter as an example:
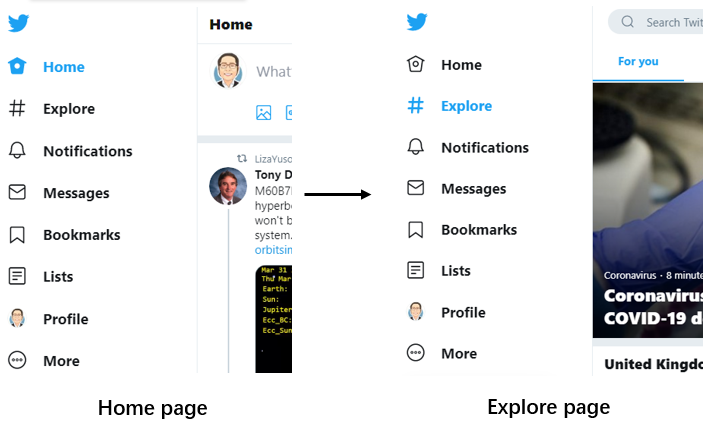
If we login to our Twitter account, we can see a menu on the left-hand side of the page. We call it as a navigation bar, which helps us to navigate throughout the web site (e.g. from Home page to the Explore page). Every time we browse from one page to another, the navigation bar remains the same, and only a specific portion of the web page changed.
Hence, it is impractical if we write the codes for the navigation bar in every single web pages within our web site, and change each page manually every time we change the design of our web site. ASP.NET offers us a solution - the Master Page. By using the Master page, we will only need to code the standard layout in the Site.Master, and this will be implemented to the rest of the pages within our web site.
Requirements
- Microsoft Visual Studio (I am using the 2019 version). See here on how to download and install.
- Bootstrap. See here on how to add the Boostrap package in ASP.NET.
A Web page Layout
Let’s start by understanding the basic concept of the layout of a web page. The example below shows a web page which has five regions: Header, Content, Advertisement, Recommended Book and Footer.

Note: Image source (link)
For the sake of simplicity, we will focus only on three regions: Header, Content and Footer. Recall the example of the Twitter page discussed above, a web application usually has the same Header and Footer across all pages. The Content is the region where the unique content for each web page is located.
Hence, we will define the Header and Footer region in our ASP.NET Master page and create the unique content in the rest of the web pages within the same web application.
The Sitemap
Before we start to develop our web site, we need to first have a sitemap , which lists all the web pages within the web site and how these pages are interrelated. Just like the Twitter web site above which has pages like Home page, Explorer page, Profile page, now we are going to create a sitemap for our web site.
Our web site, which I call it as ASP.NET Tutorial website has the following web pages:
- Home page
- Profile page
- Contact
- Web Chat page
- Online Enquiry page
The sitemap above shows that we have four web pages: Home, Profile, Web Chat and Online Enquiry page. Note that in this example, we do not have a page for Contact. The users can directly access the Web Chat page and Online Enquiry page, which are categorised under Contact.
By now, we can have a rough idea that our website is going to look something like the one below:
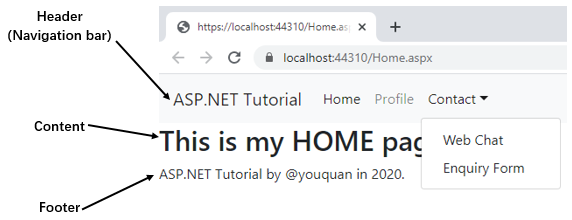
- Header region (with a navigation bar, which created based on our sitemap)
- Content region (a simple text which indicates what page it is)
- Footer region (website’s info, copyright etc.)
Create a Master Page with ASP.NET
Note: We can still use the ASP.NetTutorial project which we have created in the previous tutorial. Keep the Login page for now.
-
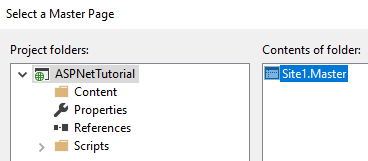
Right click on the project (e.g. ASP.NetTutorial) and select Add → New Item. Under Web, select Web Forms and then click on Web Forms Master Page. We can specify the name for the Master page. I maintain its default name -
Site1.
ASite1.Masterpage will be created automatically with the codes as follow:<%@ Master Language="C#" AutoEventWireup="true" CodeBehind="Site1.master.cs" Inherits="ASPNetTutorial.Site1" %> <!DOCTYPE html> <html> <head runat="server"> <title></title> <asp:ContentPlaceHolder ID="head" runat="server"> </asp:ContentPlaceHolder> </head> <body> <form id="form1" runat="server"> <div> <asp:ContentPlaceHolder ID="ContentPlaceHolder1" runat="server"> </asp:ContentPlaceHolder> </div> </form> </body> </html> -
Next, we create the rest of the web pages. Right click on the project (e.g. ASP.NetTutorial) and select Add → New Item. Under Web, select Web Forms and then click on Web Form with Master Page. Name these web pages as
Home.aspx,Profile.aspx,WebChat.aspxandEnquiryForm.aspxrespectively. We will be asked to select the Master page for each of the web pages. In this case, we need to selectSite1.Master, which is the Master page for these pages.
Note that these web pages have a few lines of codes readily available as follow:<%@ Page Title="" Language="C#" MasterPageFile="~/Site1.Master" AutoEventWireup="true" CodeBehind="Home.aspx.cs" Inherits="ASPNetTutorial.Home" %> <asp:Content ID="Content1" ContentPlaceHolderID="head" runat="server"> </asp:Content> <asp:Content ID="Content2" ContentPlaceHolderID="ContentPlaceHolder1" runat="server"> </asp:Content>
We can see a ContentPlaceHolder control with ID ContentPlaceHolder1 in Site1.Master. This is the place where other pages have their own unique content. The common design for all pages within a web site (e.g. Header, Footer etc.) is placed outside this ContentPlaceHolder.
In other pages (e.g. Home.aspx, Profile.aspx), the Master page of these pages are defined in the <%@ Page %> directive (MasterPageFile="~/Site1.Master). These pages also have a Content control, which allow us to place unique content for every single page.
Code the Master Page with Bootstrap
As mentioned earlier, our Master page consists of three regions: Header, Content and Footer. The Content region is readily available in our Master page, where we can find the ContentPlaceHolder control.
-
Now, create the Header region by adding a
<header></header>tag within the<body>...</body>but BEFORE the ContentPlaceHolder control. -
Then, add the Footer region by adding a
<footer></footer>tag within the<body>...</body>but AFTER the ContentPlaceHolder control.<html> <head runat="server"> <title></title> ...other codes... </head> <body> <header></header> ...other codes... <asp:ContentPlaceHolder ID="ContentPlaceHolder1" runat="server"></asp:ContentPlaceHolder> ...other codes... <footer></footer> <body> </html> -
Next, add the Bootstrap navigation bar codes into
<header></header>tag.<nav class="navbar navbar-expand-lg navbar-light bg-light"> <a class="navbar-brand" href="#">ASP.NET Tutorial</a> <button class="navbar-toggler" type="button" data-toggle="collapse" data-target="#navbarNavDropdown" aria-controls="navbarNavDropdown" aria-expanded="false" aria-label="Toggle navigation"> <span class="navbar-toggler-icon"></span> </button> <div class="collapse navbar-collapse" id="navbarNavDropdown"> <ul class="navbar-nav"> <li class="nav-item active"> <a class="nav-link" href="Home.aspx">Home</a> </li> <li class="nav-item"> <a class="nav-link" href="Profile.aspx">Profile</a> </li> <li class="nav-item dropdown"> <a class="nav-link dropdown-toggle" href="#" id="navbarDropdownMenuLink" data-toggle="dropdown" aria-haspopup="true" aria-expanded="false">Contact</a> <div class="dropdown-menu" aria-labelledby="navbarDropdownMenuLink"> <a class="dropdown-item" href="WebChat.aspx">Web Chat</a> <a class="dropdown-item" href="EnquiryForm.aspx">Enquiry Form</a> </div> </li> </ul> </div> </nav>You can learn more about Bootstrap navigation bar by following this link.
-
Finally, add the following line within the
<footer></footer>tag.ASP.NET Tutorial by @youquan in 2020.Of course, you can put your own information within the
<footer></footer>tag. Now, viewSite1.Masterin Split or Design mode to check on the design of our Master page.
Add Content to Other Pages
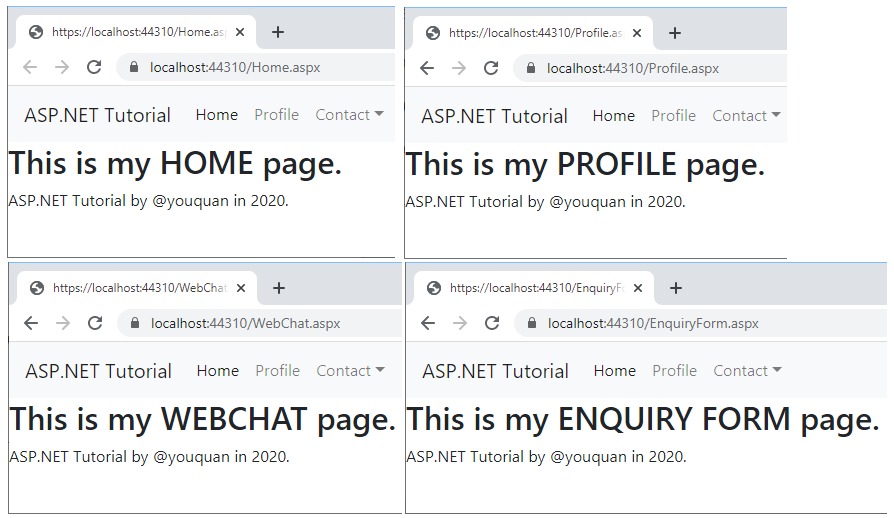
We are now going to add unique content into each page within the web site (except the Master page). Go to Home.aspx and add a heading within the Content control:
<%@ Page Title="" Language="C#" MasterPageFile="~/Site1.Master" AutoEventWireup="true" CodeBehind="Home.aspx.cs" Inherits="ASPNetTutorial.Home" %>
<asp:Content ID="Content1" ContentPlaceHolderID="head" runat="server">
</asp:Content>
<asp:Content ID="Content2" ContentPlaceHolderID="ContentPlaceHolder1" runat="server">
    <h2> This is my HOME page. </h2>
</asp:Content>
Repeat this for other pages, but change the content of the heading accordingly (e.g. This is my PROFILE page.).
Set the Start Page and Run Our Project
Commonly, a web site always start with the Home page. Hence, whenever we test our web project, we would like to first start with this page. To do this, right click on the Home page file - Home.aspx and select Set As Start Page. Now, run the project and test the navigation bar, which should lead you to different pages.
Takeaways
I hope by now:
- You can explain what is a web page layout and what is a sitemap.
- You are confident to create a Master page for a multiple pages web site in ASP.NET.
- You know how to create a navigation bar using Bootstrap.
Coming up next, we will learn:
- How to use create a database in ASP.NET.
I hope you found this tutorial helpful! If you have more questions, please let me know by commenting below.